If you’re looking for a recipe that’s equal parts fun to make and impossible to resist, these Cheeseburger Pockets are about to become your new go-to. Picture everything you love about a classic cheeseburger — seasoned ground beef, melty cheese, tangy pickles, and that irresistible burger sauce — all wrapped up inside a golden, flaky biscuit dough pocket. They’re handheld, totally portable, and absolutely packed with flavor. Whether you’re planning a picnic at the park, packing lunch for the kids, or just need a quick weeknight dinner that the whole family will actually eat, these cheeseburger pockets deliver every single time.

The best part? They come together in 35 minutes using simple, everyday ingredients. No grill required. No special equipment needed. Just a baking sheet, a skillet, and your oven. Let’s talk about why this recipe works so well — and all the ways you can make it your own.
Why You’ll Love These Cheeseburger Pockets
There’s a reason handheld foods are always a crowd-pleaser. When something is easy to pick up and eat without utensils, it just feels more fun — and more practical. These cheeseburger pockets check every box. They’re great for adults, kids, picky eaters, and hungry teenagers who need something substantial after school. They reheat well, travel well, and you can even make them ahead of time and pop them in the oven when you’re ready to eat.
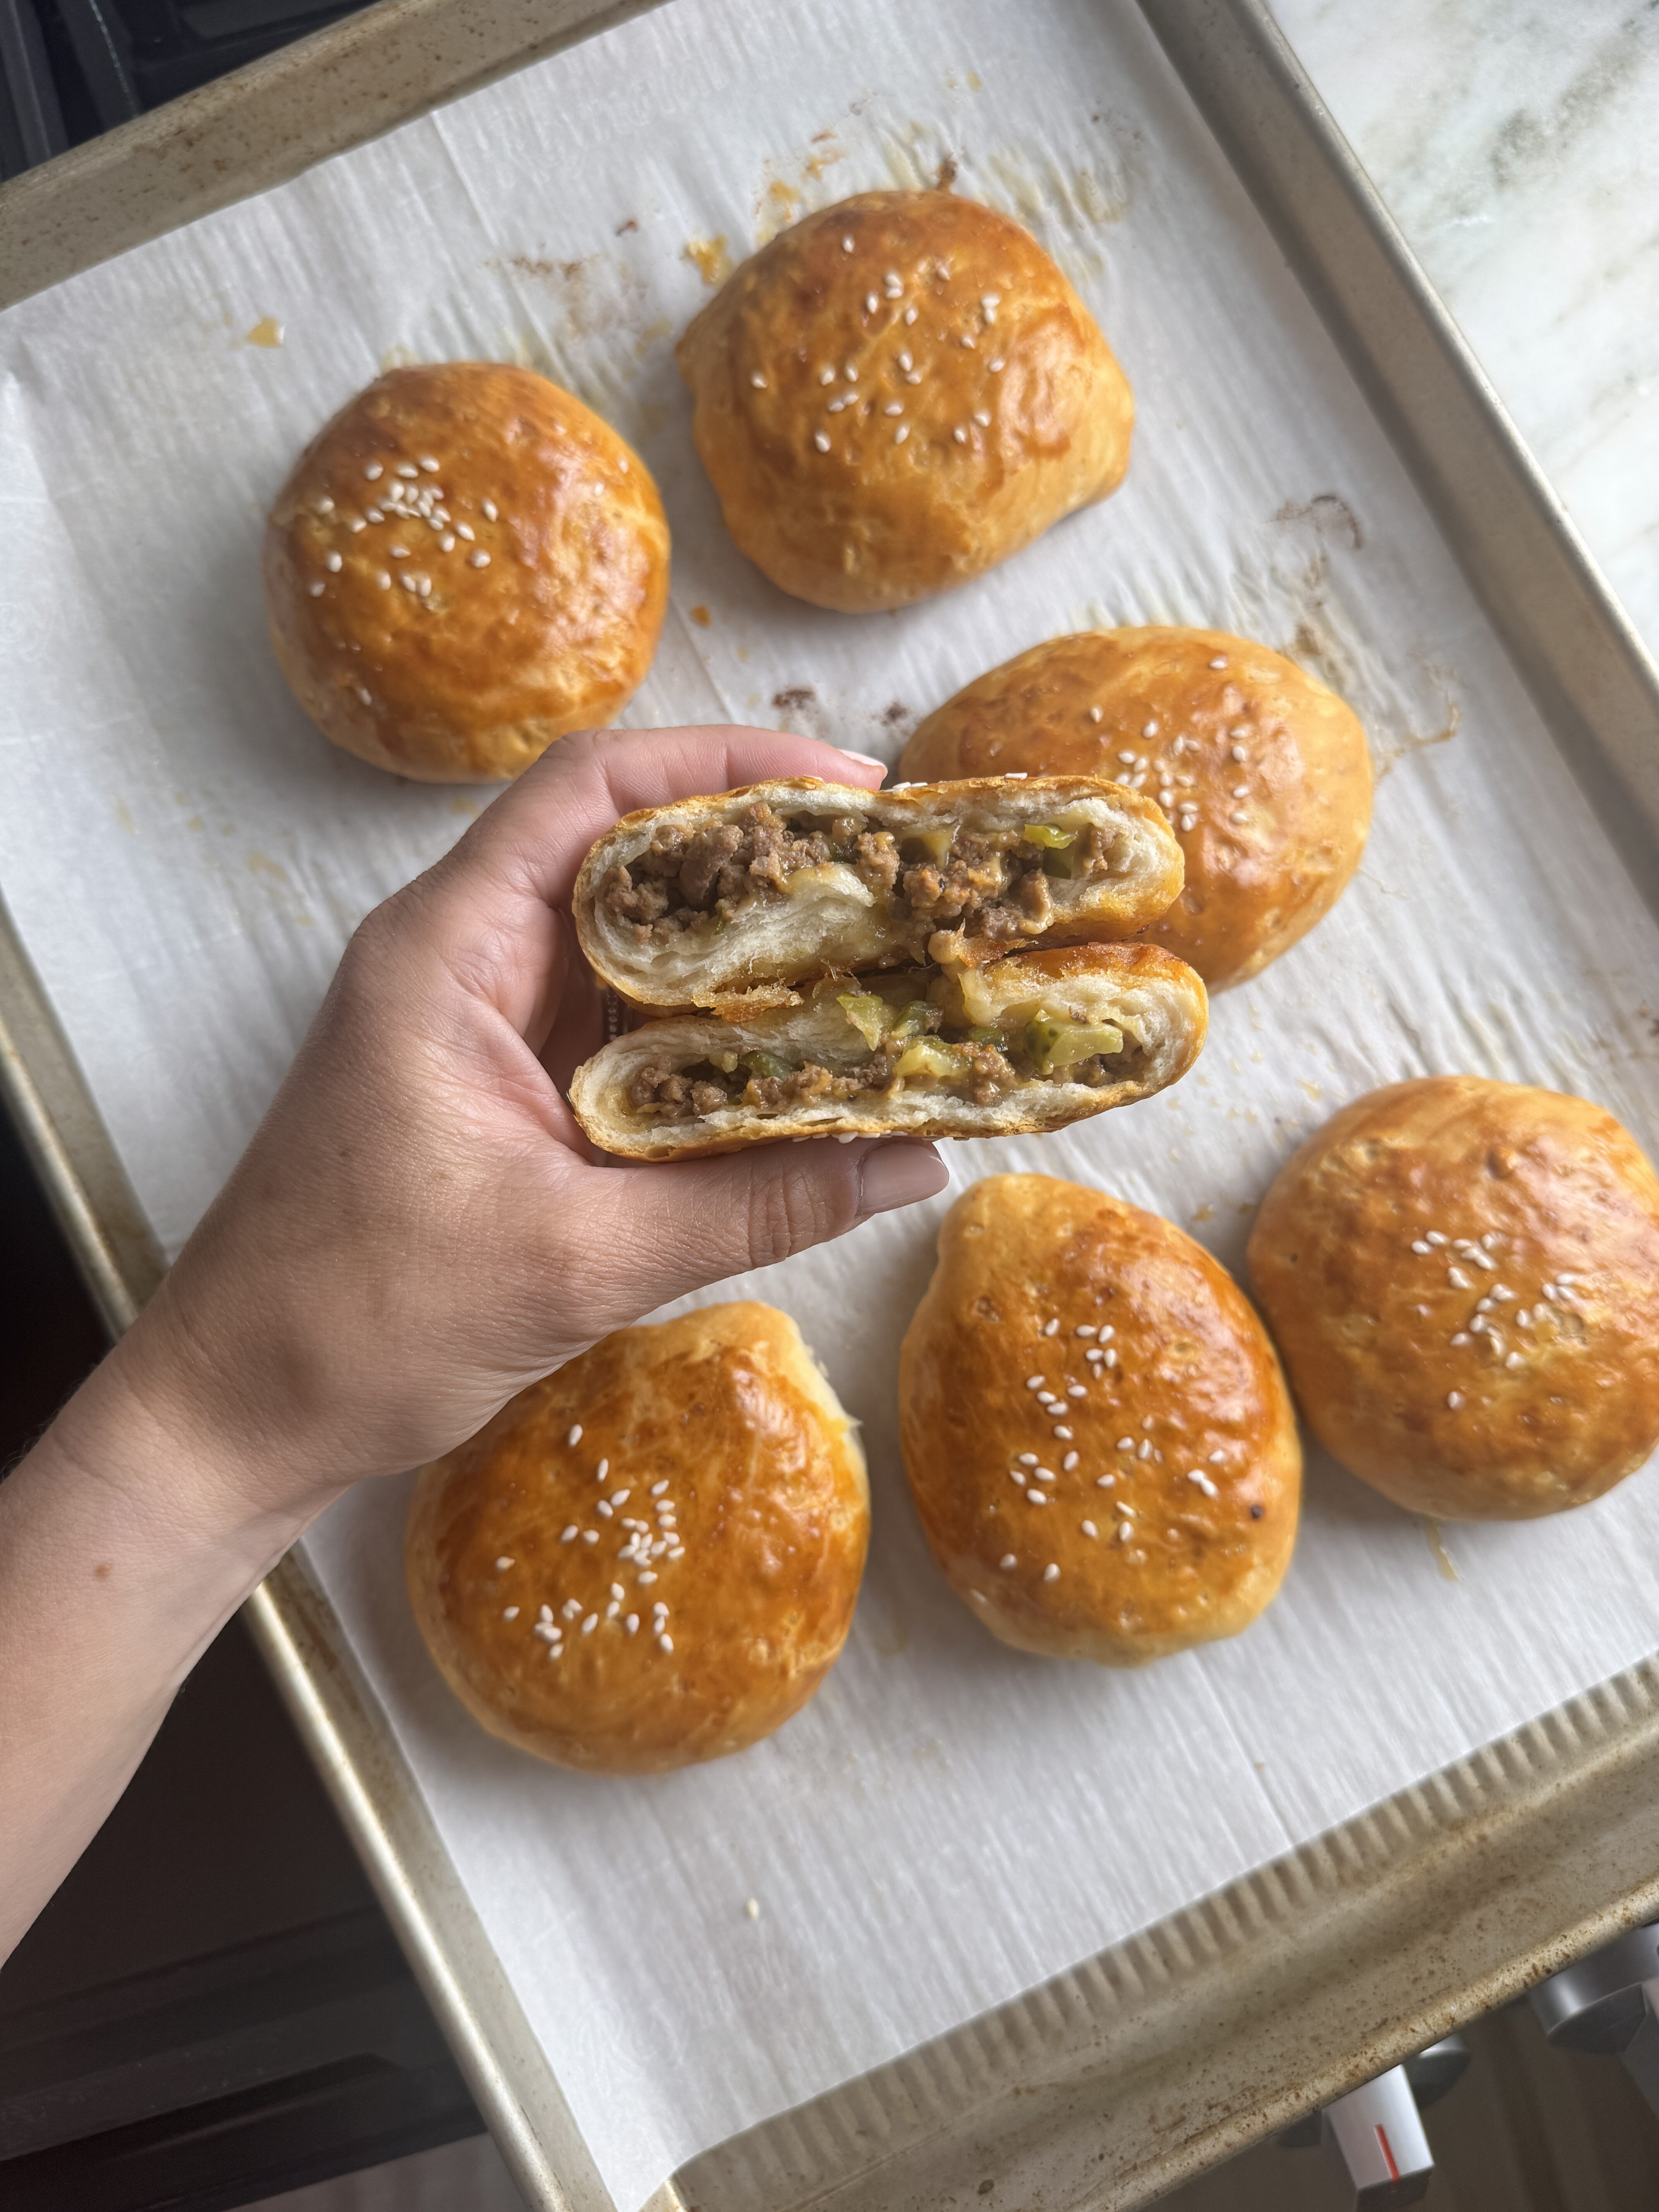
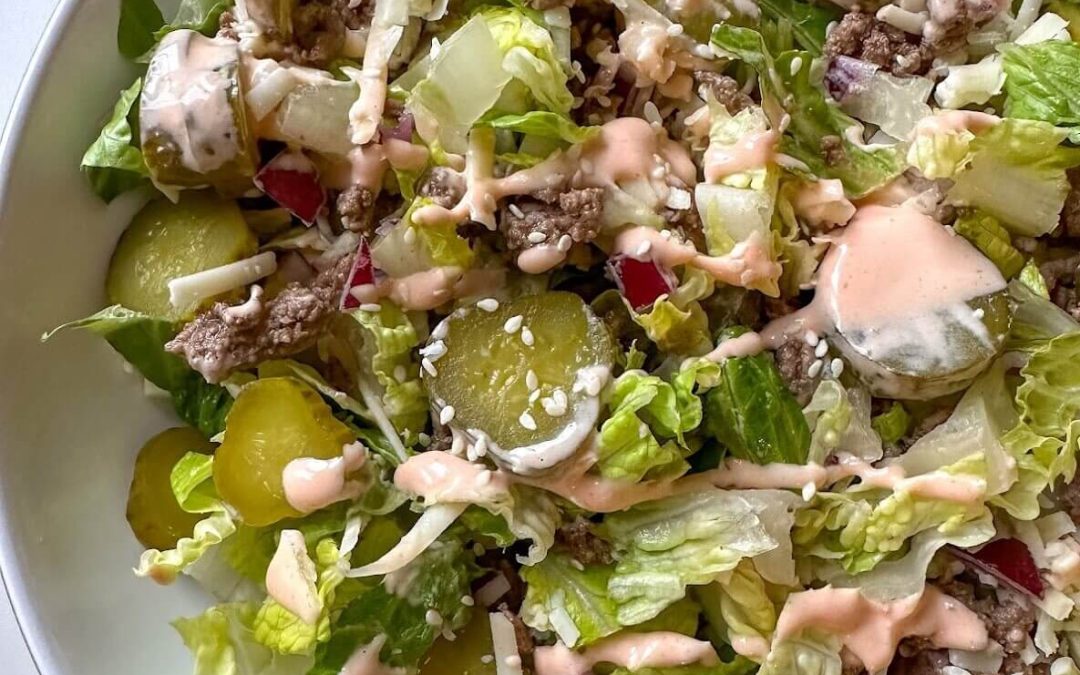
The filling is inspired by a classic smash burger sauce — a creamy, tangy mixture of ketchup and mayo that coats the seasoned beef and makes each bite rich and satisfying. Add in the shredded cheese that melts right into the meat, the diced pickles that bring that essential briny crunch, and you’ve got a flavor profile that’s unmistakably cheeseburger. Wrapped in Pillsbury biscuit dough that puffs up golden and buttery in the oven, these pockets are a guaranteed hit.
Ingredients You’ll Need
One of the things that makes this recipe so approachable is that the ingredient list is short and made up of things you likely already have at home. Here’s a quick rundown of what goes into these cheeseburger pockets and why each ingredient matters.
Ground beef is the heart of the filling. Use 80/20 ground beef for the best flavor — the fat content keeps the meat juicy and flavorful even after baking inside the dough. You’ll cook it down with a simple blend of garlic powder, onion powder, salt, and pepper, which gives the beef a savory, well-rounded seasoning without any complicated spice blends.
Ketchup and mayonnaise come together to create a simple burger sauce that adds creaminess and tang to the filling. If you’re a fan of the classic special sauce at your favorite burger joint, you’ll immediately recognize these flavors. The sauce also helps bind the filling together so it doesn’t spill out of the pockets when you take a bite.
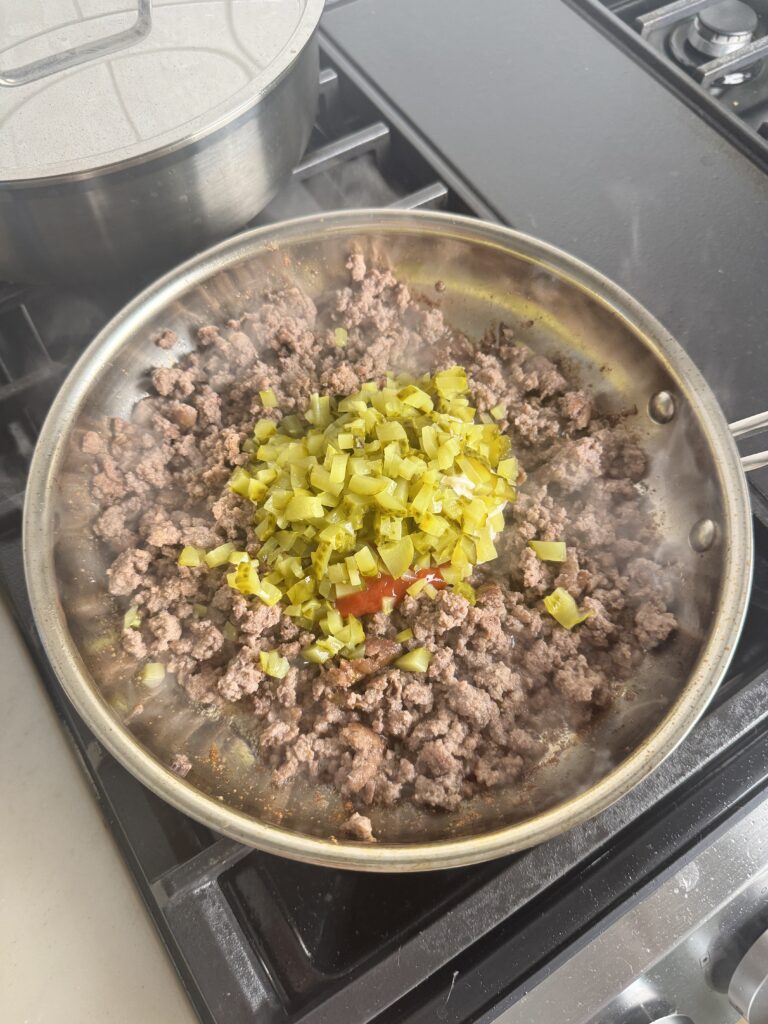
Diced pickles are non-negotiable here. They add that signature burger flavor — a little sour, a little briny — that cuts through the richness of the beef and cheese. Use dill pickles for the most classic result, but bread and butter pickles work too if you like a slightly sweeter profile.
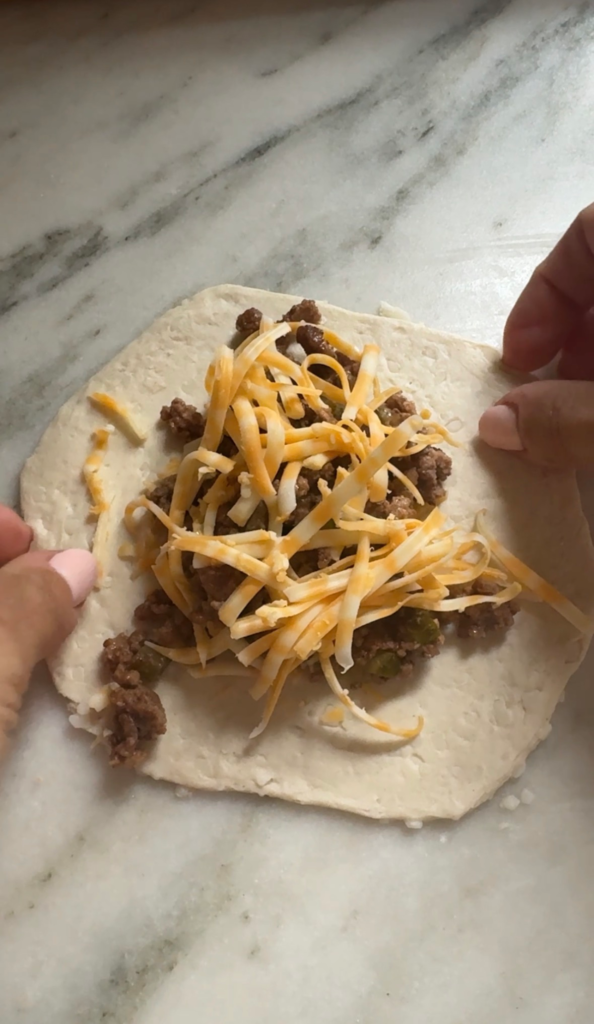
Shredded cheese melts into the warm beef filling and gets a little gooey and stretchy inside the pocket. Cheddar is the classic choice, but feel free to swap in American, Monterey Jack, or a colby-jack blend depending on what you have on hand or what your family loves.
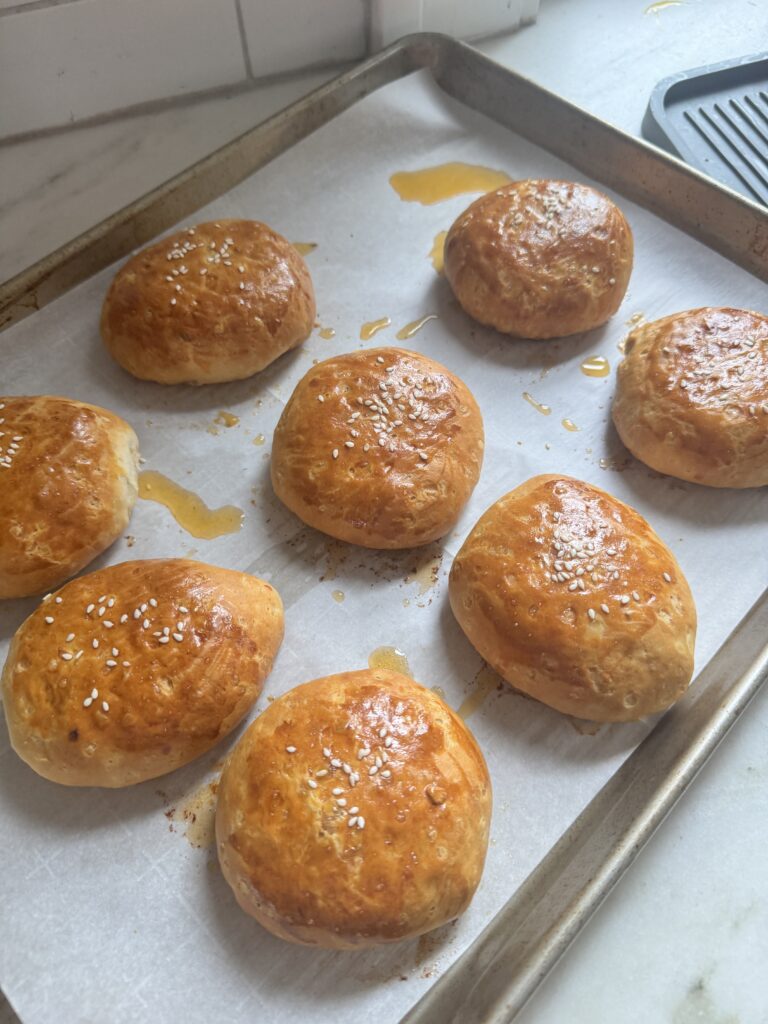
Pillsbury biscuit dough is the secret weapon here. It’s flaky, buttery, and puffs up beautifully in the oven. Each biscuit gets pressed flat and used to wrap around the filling, then sealed up into a pocket that bakes golden and gorgeous. An egg wash brushed on top gives them that bakery-style sheen, and a sprinkle of sesame seeds is an optional but totally charming touch that makes them look just like burger buns.
How to Make Cheeseburger Pockets
The process is straightforward and beginner-friendly. Start by browning your ground beef in a skillet over medium-high heat, breaking it up as it cooks. Once it’s no longer pink, drain any excess grease. Season the meat with garlic powder, onion powder, salt, and pepper, then stir in the ketchup, mayo, and diced pickles.
While the filling cools slightly, preheat your oven to 375°F and line a baking sheet with parchment paper. Open your can of Pillsbury biscuits and separate them. On a lightly floured surface, flatten each biscuit into a round about 5 inches in diameter. Place a generous spoonful of the beef filling in the center of the biscuit rounds, leaving a border around the edge, top with cheese. Then pinch the sides and fold into the middle tightly. Transfer the pockets to your prepared baking sheet, brush the tops with beaten egg, and sprinkle with sesame seeds if using.
Bake for 18 to 22 minutes, or until the pockets are deep golden brown and cooked through. Let them cool for a few minutes before serving — the filling will be hot!
Tips for the Best Cheeseburger Pockets
Don’t overfill the pockets. It’s tempting to pile in a lot of filling, but too much will make them difficult to seal and may cause them to burst in the oven. A generous heaping tablespoon is the sweet spot.
Make sure to drain the beef well. Excess grease in the filling can make the biscuit dough soggy from the inside, so take a moment to drain after browning the meat.
Seal the edges tightly. Use a fork to crimp around the entire edge of each pocket, pressing firmly. You can also dip your fingertip in a little water and run it along the edge before sealing to help the dough stick better.
Let the filling cool slightly before assembling. If the filling is piping hot when you add it to the dough, it can start to soften and compromise the dough before it even gets in the oven. Give it five minutes to cool down.
Serving Suggestions
These cheeseburger pockets are fantastic on their own, but they’re even better with a few simple sides. Serve them with a side of ketchup or special sauce for dipping, a handful of potato chips, or a simple green salad. For a park picnic, pack them in a container with some cut veggies and fruit, and you’ve got a complete and satisfying meal that travels beautifully. They’re also great alongside coleslaw, macaroni salad, or a cup of tomato soup for a cozy weeknight dinner.
Make Ahead and Storage
Cheeseburger pockets are meal prep friendly, which makes them even more appealing for busy households. You can make the filling up to two days ahead and store it in the refrigerator in an airtight container. When you’re ready to eat, just assemble and bake. Fully baked pockets can also be stored in the refrigerator for up to three days. Reheat them in the oven at 350°F for about 10 minutes to bring them back to life — they’ll crisp right back up and taste just as good as when they were fresh. You can also microwave them in a pinch, though the dough won’t be as crispy.
For longer storage, freeze fully baked and cooled pockets in a single layer on a baking sheet, then transfer to a freezer-safe bag. Reheat straight from frozen in a 375°F oven for about 20 to 25 minutes.
Variations to Try
Once you’ve made the classic version, there are so many fun ways to remix this recipe. Try a bacon cheeseburger pocket by mixing in a few tablespoons of cooked crumbled bacon into the filling. Make a spicy jalapeño burger pocket by adding diced pickled jalapeños and a dash of hot sauce to the mix. For a mushroom Swiss version, swap the cheddar for Swiss cheese and add some sautéed mushrooms to the filling. You can even make a pizza pocket version using the same dough technique with a pizza-inspired filling for the kids.
However you make them, cheeseburger pockets are the kind of recipe that earns a permanent spot in your weekly rotation. They’re quick, satisfying, customizable, and genuinely fun to eat. Make a batch this weekend — you won’t regret it.
If you love easy, handheld meals like these cheeseburger pockets, you’ll definitely want to check out a few more of our favorite quick dinners. Our BBQ Chicken Mini Quesadillas are packed with smoky, saucy chicken and melty cheese — they come together in just 20 minutes and are always a hit with the whole family. And if you’re looking for another grab-and-go option, our Easy Ham & Cheese Rolls are soft, cheesy, and totally irresistible — perfect for lunchboxes, picnics, or a lazy weeknight dinner.


This recipe hasn't been reviewed yet!